Dosbox Install From Multiple Floppy
DOSBox is a cross-platform freeware application used to run DOS-based software from the 1980s and 1990s on today's computers. Occasionally, users want to install a program that was originally released on multiple floppy disks. Because most users no longer have or use a floppy drive, the individual floppies take the form of 'disk images,' virtual reproductions of the original floppies that can be 'mounted' onto virtual drives and used just like the original. Installing a multiple-floppy image program in DOSBox is done using a command called 'imgmount.' With this command, it is possible to mount multiple floppy images and install them as though from an actual floppy drive.
Step 1
Download DOSBox for free. An Open Source DOS emulator to run old DOS games. DOSBox emulates a full x86 pc with sound and DOS. Its main use is to run old DOS games on platforms which don't have DOS (Windows 7, 8, 8.1 and 10 / Linux / FreeBSD / Mac OS X).
Make sure that your floppy image files are in either .IMG or .ISO format. These are the two floppy image formats that DOSBox recognizes. If they are in another format, you will need to convert them to .IMG or .ISO using the utility of your choice. Some applications that can do this include WinImage and Magic Iso Maker.
Step 2
Open DOSBox. At the 'Z:' prompt -- DOSBox's internal virtual command line prompt -- type 'imgmount' followed by the letter of the virtual drive you want to create to mount the floppy images. Choose a drive letter not already represented on your system. For example, if you have no drive 'F:' type 'imgmount f' followed by a space. Do not press 'Enter' yet.
Step 3
Type the path and name of each floppy image file in order. Multiple-floppy installations number the disks so that the user knows in what order to insert them for installation. For example, if there are four floppy images named 'gameX.img,' where 'X' represents the number of the disk, and they are in a folder named 'Game' on your 'C:' drive, type 'C:Gamegame1.img C:Gamegame2.img' and so on. Follow the last with a space and then type '-floppy.' This tells DOSBox what kind of images are to be mounted.
Step 4
Press 'Enter.' DOSBox will mount the floppy images onto the virtual drive. Note that DOSBox does not give each image its own drive letter. You can cycle through the different floppy images by pressing 'CTRL-F4.' Type 'cd X,' where 'X' represents the letter of the newly mounted virtual drive, and press 'Enter.' This will make the virtual drive the active drive. Type 'dir' and press 'Enter' to see a list of files on the first floppy image. One of these files will be the installation program, often called 'install.exe' or 'setup.exe.' Type the name of that file and press 'Enter.' The installation program will begin.
Press 'CTRL-F4' when the installation program asks for the next disk. This will tell DOSBox to cycle to the next floppy image mounted on the virtual drive you created. Continue pressing 'CTRL-4' whenever the installation program prompts you for another disk until the installation program completes.
- Brand X Pictures/Brand X Pictures/Getty Images
More Articles
Notes
You will need a copy of the Windows 95 boot disk.
Step 1: DOSBox Setup
Edit DOSBOX.CONF (the configuration file for DOSBox) and some of the lines with this code (if it exists):
output=surface -> output=opengl
vmemsize=x -> vmemsize=8
Your job in Ibiza will be to win all the races from the competitors based on blacklist style. Test drive unlimited 2 enter key. Oahu is exclusively featured in the game, several races will be played on the roads of Oahu island. Moreover, you will not only race in this game, but explore different parts of the world such as Ibiza. As soon as you defeat all the challenges in Oahu, you will have to move to Ibiza, because that’s where most of the top reputed racers live.
memsize=16 -> memsize=512
core=auto -> core=dynamic
cputype=auto -> cputype=pentium
cycles=auto -> cycles=max
voodoo=default -> voodoo=opengl
(this will be the end of DOSBOX.CONF)
[autoexec]
SET GLIDE=600
(add these after you have made WIN95VHD.img)
imgmount a '/path/to/Windows95b.img' -size 1,440
imgmount c '/path/to/WIN95VHD.img' -size 2097152Corel photo paint x8 portable.
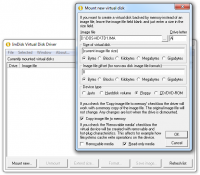
Step 2: Make the Virtual Hard Disk
Run this command for DOSBox Daum builds:
Z:> imgmake WIN95VHD.img -t hd -size 2048 -nofs
Or download the bochs tools, extract the archive, and run bximage.exe. Run the BXIMAGE.BAT under windows or wine to make an image. Here is the command for creating the image
bximage
Disk Image Creation Tool for Bochs
$Id: bximage.c,v 1.32 2006/06/16 07:29:33 vruppert Exp $
Do you want to create a floppy disk image or a hard disk image?
Please type hd or fd. [hd]
What kind of image should I create?
Please type flat, sparse or growing. [flat]
Enter the hard disk size in megabytes, between 1 and 129023
[10] 2048
I will create a 'flat' hard disk image with
cyl=xxx
heads=xx
sectors per track=xxx
total sectors=xxxxxxx
total size=2048 megabytes
What should I name the image?
[c.img] WIN95VHD.img
Writing: [] Done.
I wrote xxxxxxxxxx bytes to WIN95VHD.img.
This command creates the Windows 95 Virtual Hard Disk Image which will be used as the target image for installation files. This file can be found in the same directory as 'DOSBOX.CONF`. If you cannot mount the image, use a folder instead.
Step 3: Boot the drive
After you have made the VHD and added the lines for AUTOEXEC.BAT, restart DOSBox. To boot the drive, use command boot to boot from a drive.
Z:> boot -l a
You will now need to partition the VHD. Refer to the Windows 95 Installation Guide Step 2 for how to use make partitions here. You will also need to format the partition, which is part of Step 2.
Step 4: Getting the setup files
You will now need to get the setup files. Mount the WIN95VHD.img file we created earlier and copy the directory .WIN95 from the Windows 95 Disc. If you cannot mount the IMG file, then mount the cdrom drive as D, mkdir C:WIN95, and copy D:WIN95*.* C:WIN95. Start the Windows 95 Setup by using the commands:
A:> c:

C:> cd win95
C:WIN95> setup.exe /is
Do note after Windows 95 is ready to restart during setup, close DOSBOX, remove the floppy mount command and change the boot -l a to boot -l c. Information about setup is found here.